4.5.1. Functionality of the Container View
Administrators can see and edit all containers of the realms they are allowed to manage. A container can be in several realms. This enables the possibility that administrators of different realms can manage the same container. Users can only see and edit their own containers.
The container view submenu contains four parts: Container list, container details, create container and templates.
4.5.1.1. Container List
Container List
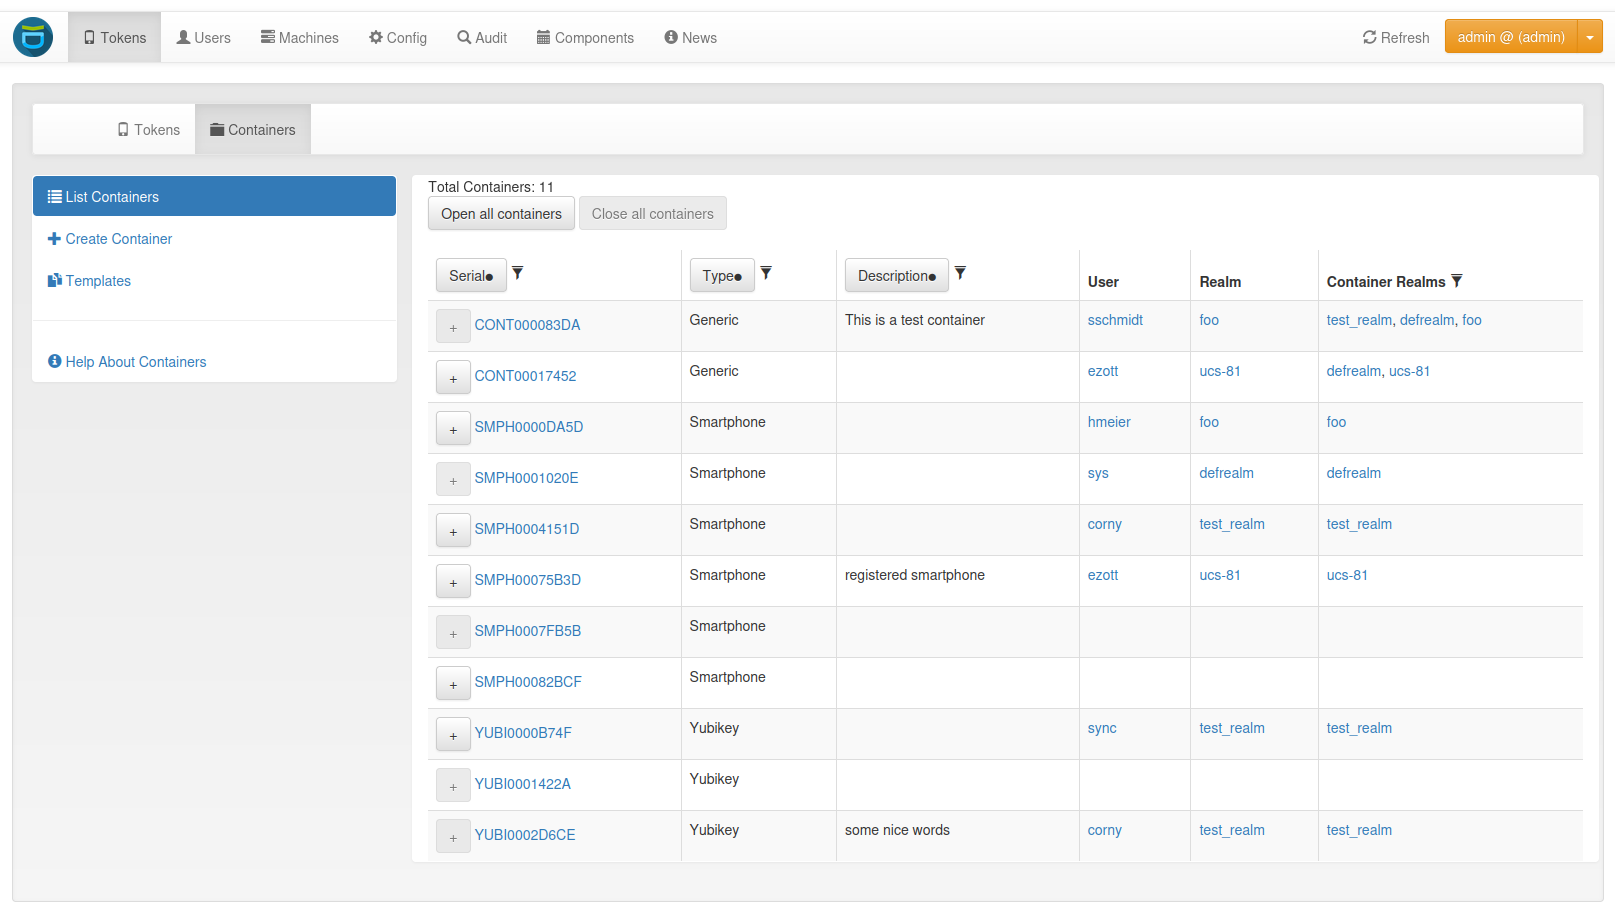
The container list displays all containers that the user or administrator is allowed to see. To view all the tokens contained in a container, click on the plus sign in front of the container serial number. Clicking on the container serial will open the container details page.
The container list can be filtered by the serial, type, description, and container realms. The list can also be sorted by the serial, type, and description in ascending and descending order.
4.5.1.2. Container Details
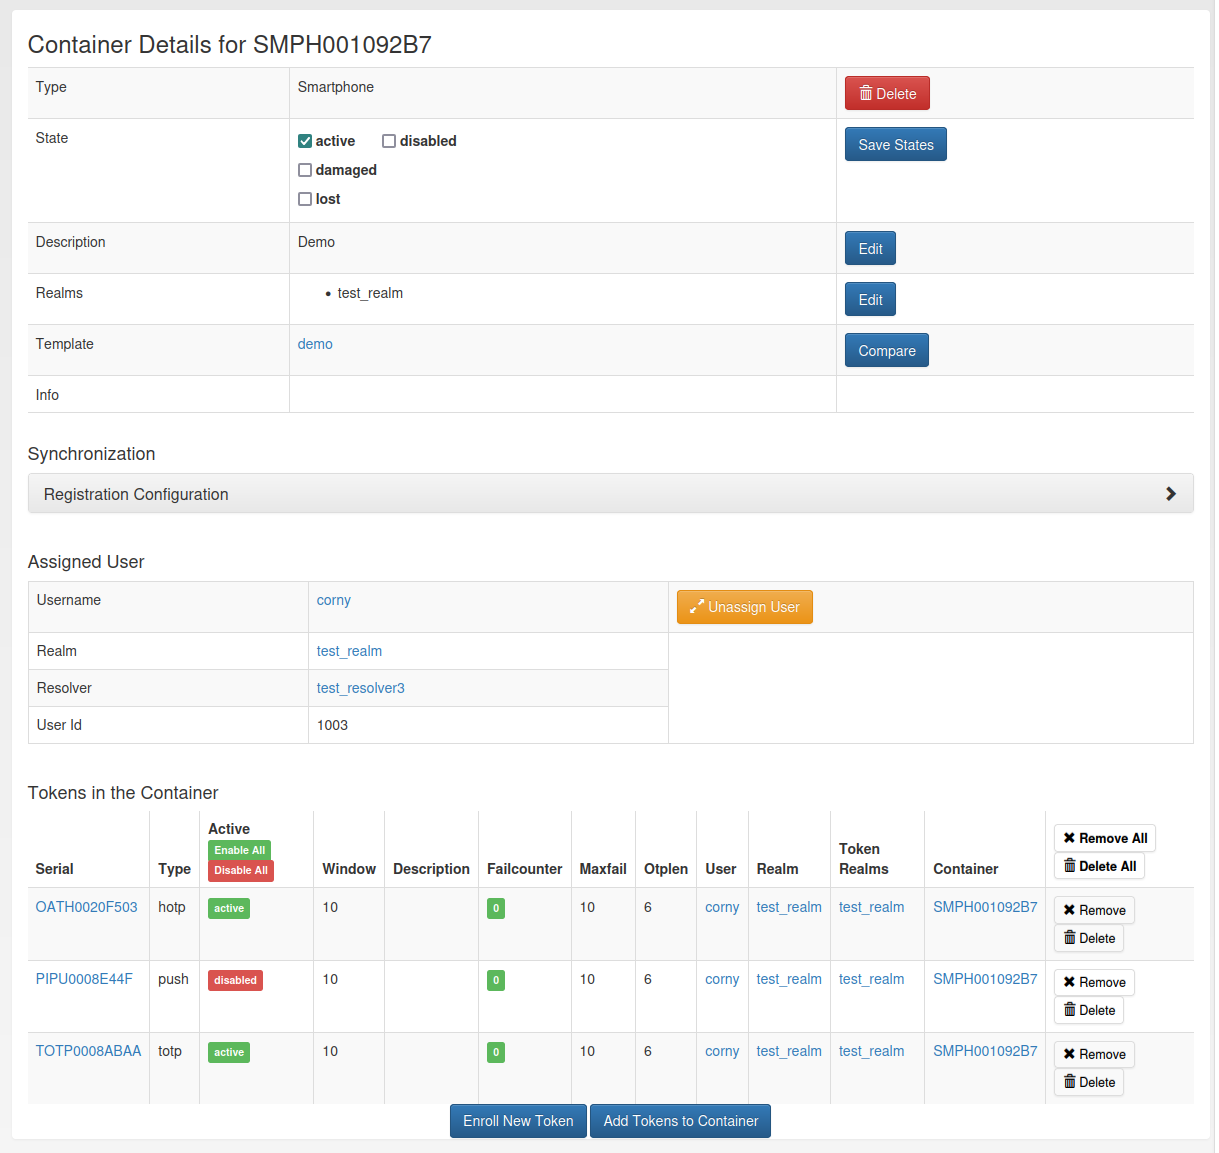
The container details page displays all container attributes. The administrator and privileged users can perform different actions on the container and the contained tokens.
Container Details
4.5.1.2.1. Delete
By clicking on the delete button, two options appear: Deleting only the container or deleting the container with all contained tokens. Tokens the user is not allowed to manage will not be deleted.
4.5.1.2.2. States
A container can be in multiple states. However, there are also states that exclude each other, e.g. active and disabled. Exclusive states are displayed next to each other.
4.5.1.2.3. Realms
A container can be in multiple realms even without having a specific user assigned. If a user is assigned, the container is automatically in the realm of the user. This realm can not be removed without unassigning the user.
4.5.1.2.4. User
To assign a user, select a realm and start typing the users name. Select one of the suggested users and assign it to the container by clicking on the Assign User button. Clicking on the assigned users name, redirects to the User Details page.
4.5.1.2.5. Template
If the container was created from a template, the template name is displayed. Clicking on the template name opens the template details page.
Additionally, the container can be compared to the template. This is useful if the template was changed after the container was created. Clicking the Compare button will show a table with the differences. The row missing lists the token types contained in the template but not in the container. The row additional lists the token types included in the container but not in the template.
4.5.1.2.6. Synchronization
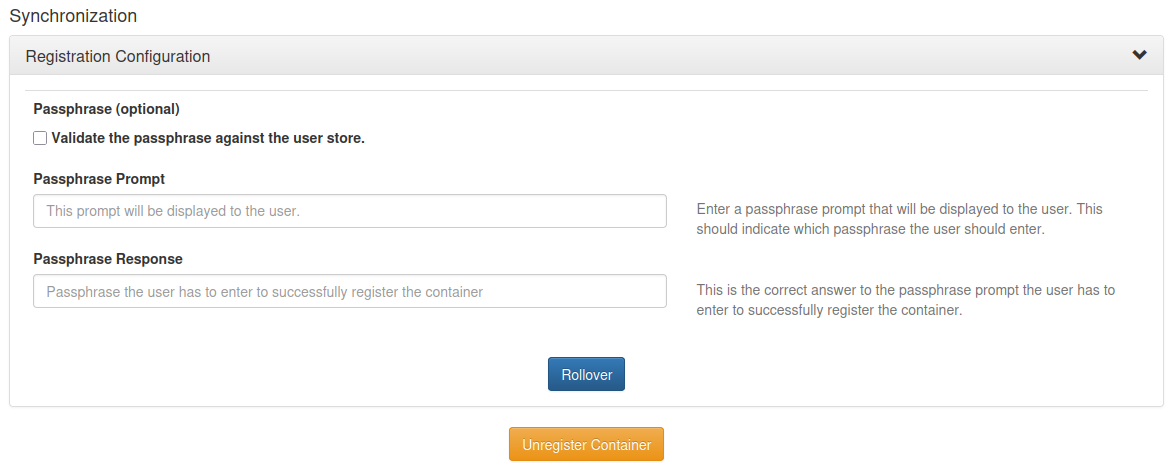
Beginning from version 3.11, smartphones can be synchronized with the container on the privacyIDEA server. To enable the synchronization, registration is required first. The registration can be initiated in the dropdown Registration Configuration.
Optionally, the user can secure the registration with a passphrase. For this, a prompt that will be displayed to the user in the authenticator app, and the correct passphrase response can be configured. Another possibility is to simply use the passphrase from the user store (Added in version 3.12). This requires that the container is assigned to a user. When the passphrase shall be evaluated against the user store you can optionally specify a prompt, otherwise a default prompt will be displayed.
After clicking the button Register Container on Device, a QR code is displayed. The user has to scan this QR code with the privacyIDEA Authenticator app to complete the registration.
Note
It is required to configure a container policy specifying at least the privacyIDEA_server_url action. See Container Policies for more information.
Synchronization Section on the Container Details Page
If the smartphone is successfully registered, the registration_state in the container info changes from client_wait to registered. In case the QR code gets lost or the passphrase needs to be changed, the QR code can be regenerated in the dropdown Registration Configuration. However, this is only possible while the registration is in the client_wait state.
For registered containers, the time of the last synchronization and the last time a token from the container was used for a successful authentication are displayed. Note that these timestamps are only set for registered containers, hence the last authentication time stamp is not set yet for a newly registered container.
If the container with all tokens shall be registered on a new smartphone, a rollover can be performed. Similar to the registration, you can set a passphrase in the dropdown Registration Configuration and generate a new QR code by clicking on the Rollover button. The user has to scan the QR code with the new smartphone. If the new smartphone has been registered successfully, the old smartphone can no longer be synchronized. The rollover generates new secrets for all tokens in the container. This invalidates all tokens on the old smartphone. During the rollover, the registration_state changes from registered to rollover. After a successful rollover and a first synchronization with the new device, it changes back to registered.
The container can always be unregistered by clicking the Unregister button. The smartphone can not be synchronized with the server anymore. A window will appear asking if you want to disable all tokens. The window disappears automatically after a few seconds.
Note
Not all synchronization features work for offline tokens. See Synchronization for more information.
4.5.1.2.7. Tokens
At the bottom of the container details page, all the tokens in the container are listed. You can enable and disable each token and reset the failure counter. You can also remove or delete tokens from the container. If another user’s token is in the container, the user will only see the serial and all token actions will be disabled.
There are two ways to add tokens to the container. Firstly, a new token can be enrolled. The user will be redirected to the enrollment page where the user of the container and the container are pre-selected. The second option is to add an existing token. Clicking on the Add Tokens to Container button will open a token table with all the tokens that the administrator or user is allowed to see. By default, only tokens that are not yet in a container are displayed. Deselecting this option displays all tokens. Adding a token that is already in a container to another container removes it from the previous container. The token list can be filtered and sorted by various token attributes.

Add tokens to the container on the container details page
4.5.1.3. Container Create
To create a new container, first of all a type has to be selected. Below the drop-down menu, all token types that are supported by the container type are displayed. For more information on the different container types, see Container Types. Additionally, you can set a description and assign the container to a user. From version 3.11, you can also assign the container only to a realm.

Container Create
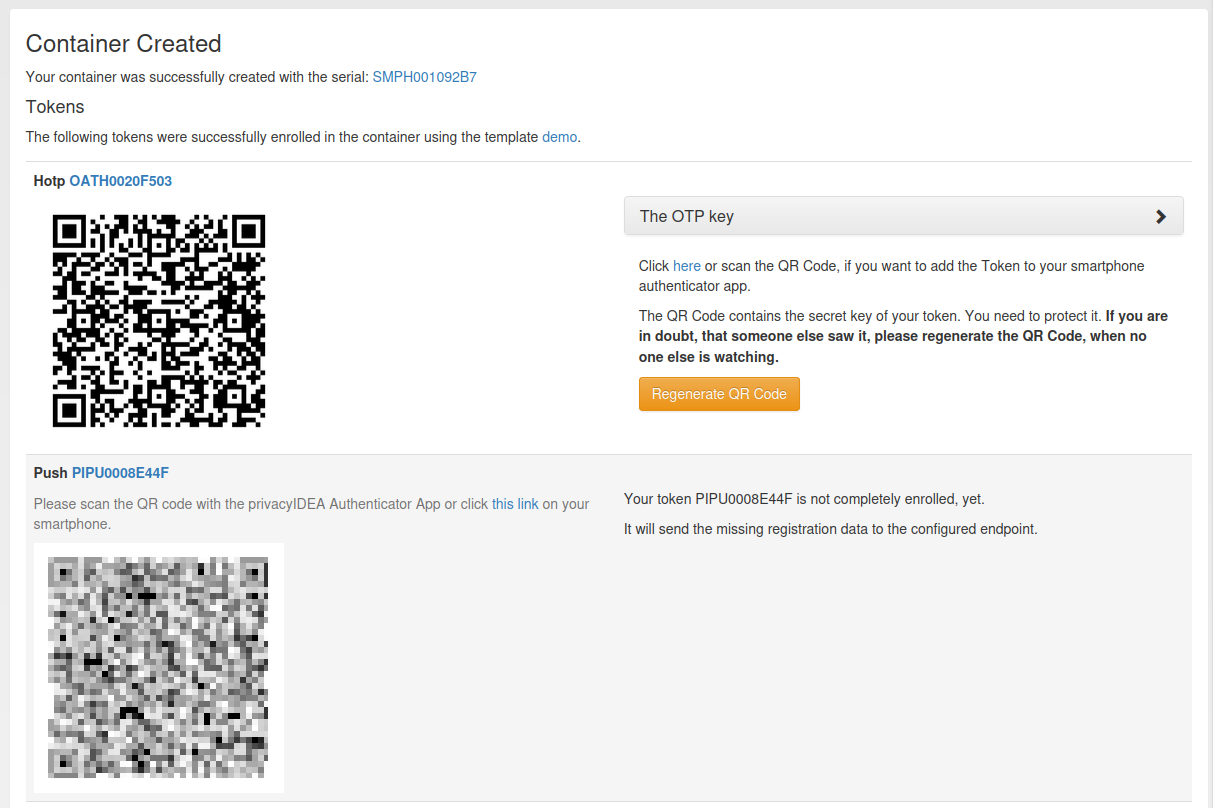
For a simplified rollout, the container can be created from a template. This will enroll predefined tokens in the container. It is also possible to modify the template in place for the container. Note that the changes are only applied to this container and do not change the template itself. The container will not be linked to the template.
After creating the container with a template, a new page opens which shows the enrollment information for each token. For HOTP tokens, for example, the QR code to enroll the token on a smartphone is displayed.
Container Created With a Template
For smartphone containers, there is an additional option on the create page to register the container on a smartphone. The registration can be secured with a passphrase. To do this, a prompt that is displayed to the user in the app, and the actual passphrase response must be set. After creating the container, a new page will open showing the registration QR code. Scan the QR code with the privacyIDEA authenticator app to finalize the registration.
If you create a smartphone container including the registration and also use a template, only the registration QR code and no enrollment information will be displayed. It is not required to enroll the tokens on the smartphone individually. After a successful registration, the tokens are automatically added during synchronization.
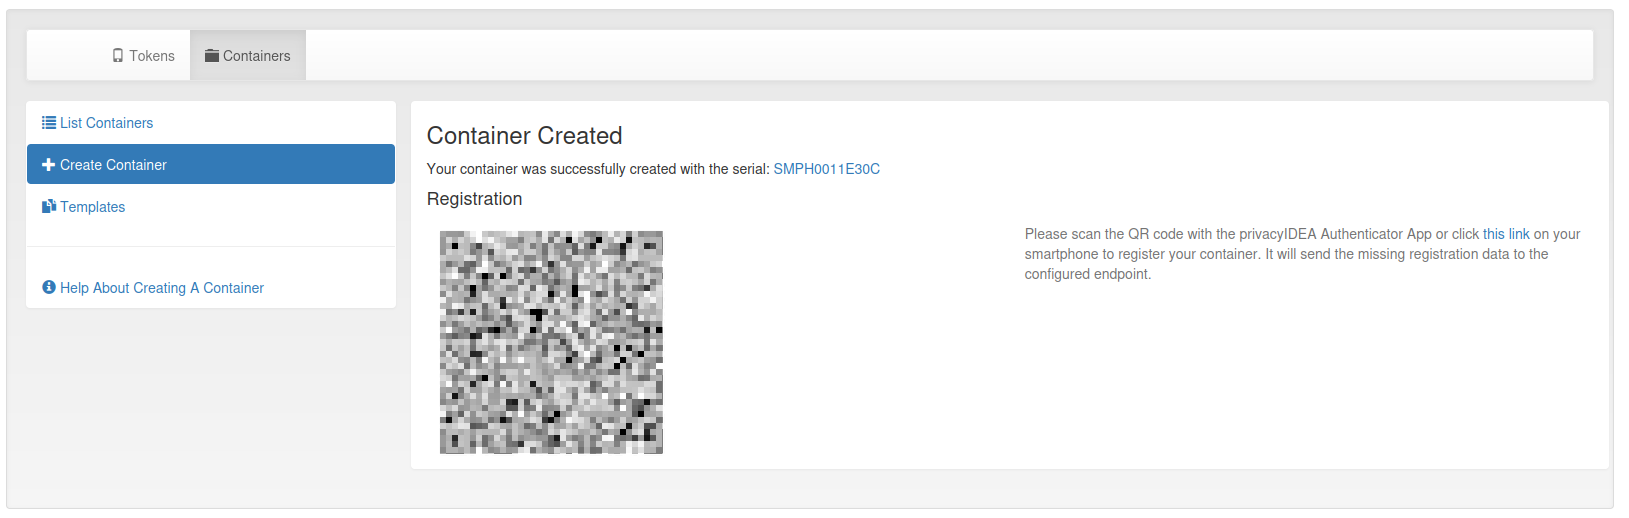
Container Created With Registration
You can also create a container on the token details page, during the enrollment of a new token, and on the user details page. However, there is only a basic container creation possible, which allows to define the container type, set a description, and assign the token owner to the container.
4.5.1.4. Templates
Templates are used to enroll predefined tokens in a container. The templates menu consists of three parts: Template list, template details, and create template.
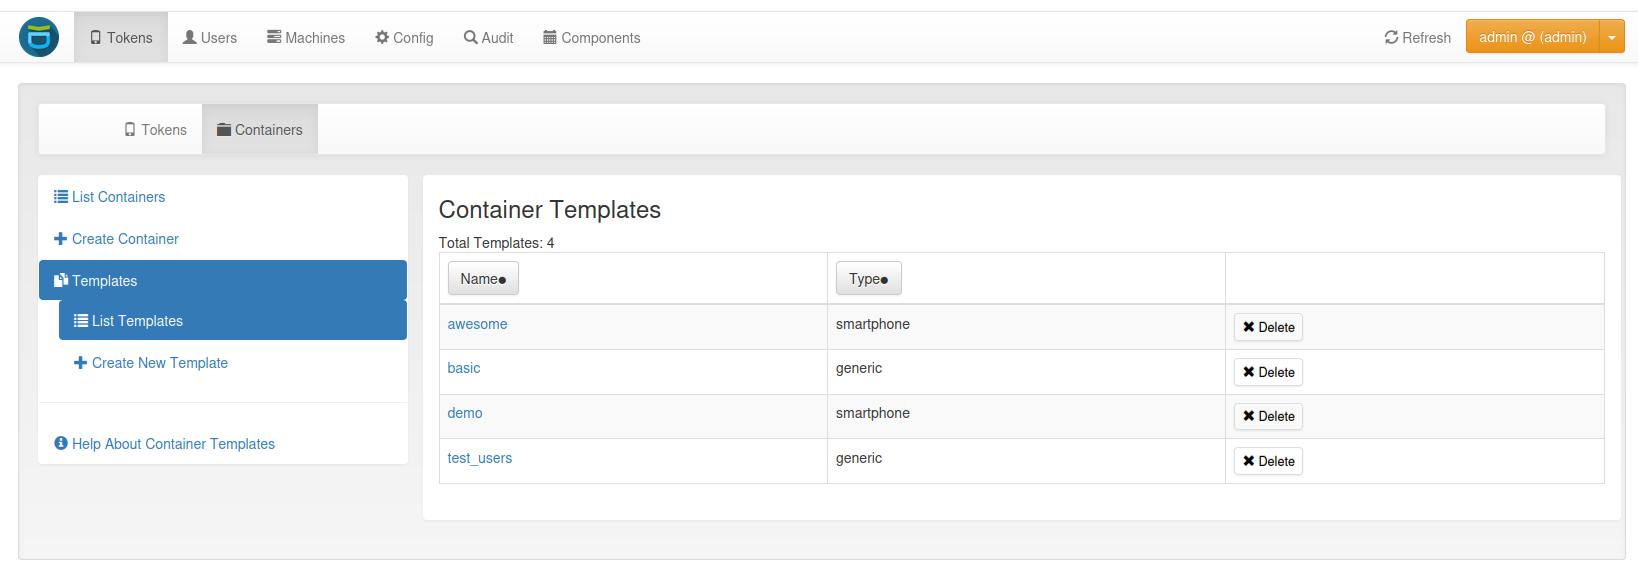
4.5.1.4.1. Template List
The template list displays the name and the container type of each template. Clicking on the template name opens the template details page.
Container Template List
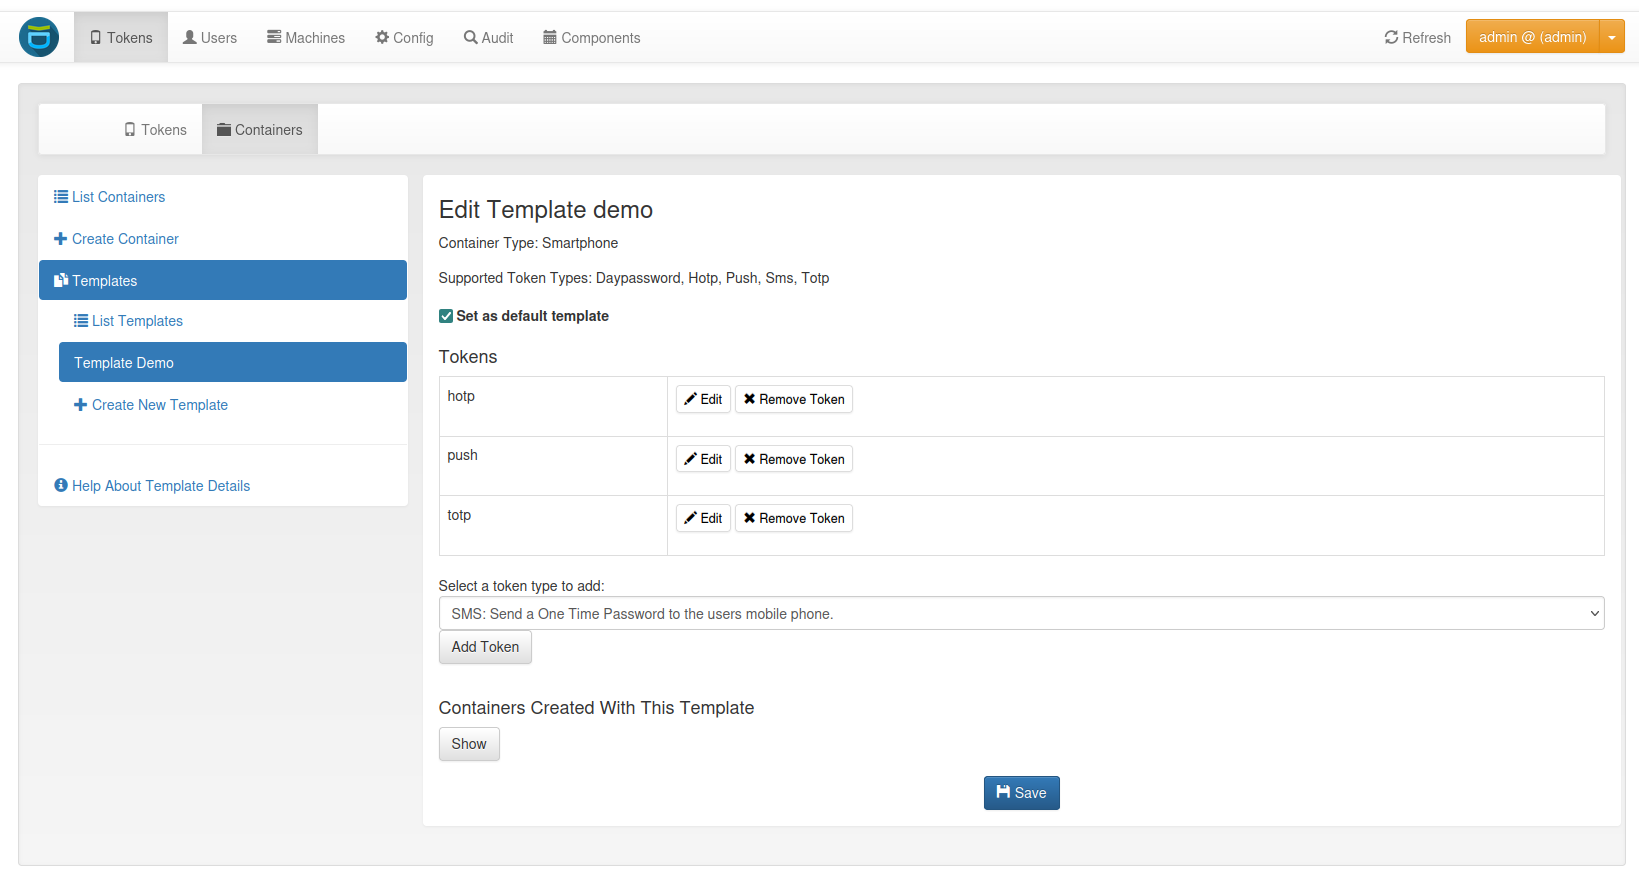
4.5.1.4.2. Template Details
At the top of the page, the name, the container type, and the token types that can be added to this template are displayed. Below is a checkbox to use the template as the default for creating new containers. For each container type, one template can be the default. Setting a template as default will remove the default setting from the previous default template.
Container Template Details
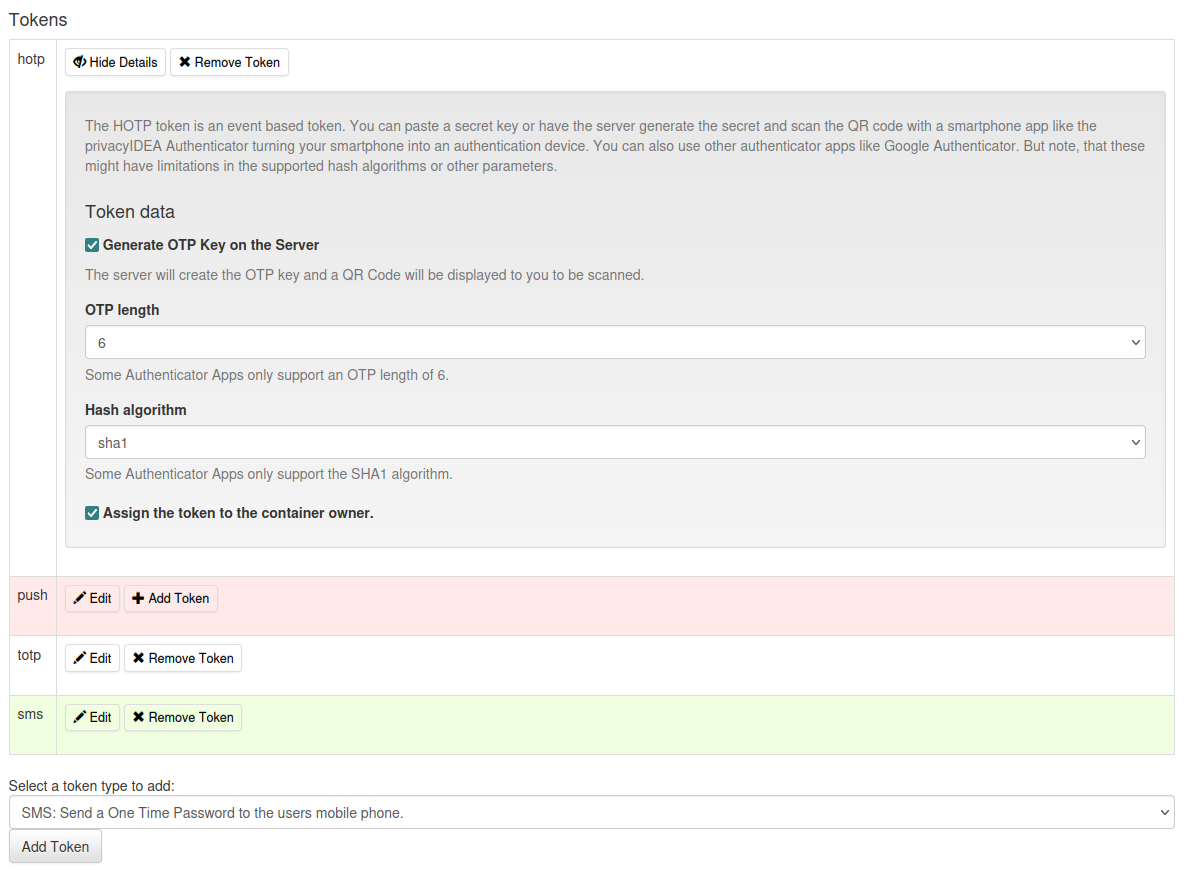
Tokens
In this section, a table shows all tokens of the template. Clicking on the Edit button opens a section to change the token type specific enroll options. At the bottom is a checkbox to assign the token to the user of the container. This option is checked by default. It is only relevant for admins. Users are always assigned to the tokens they enroll. Removing a token from the template will first highlight the token in red and finally remove if after saving the template.
Token Settings for a Container Template
Below the token table, new tokens can be added to the template. The token type can be selected from a drop-down menu. New tokens are highlighted in green in the token table and are finally added after saving the template. Newly added tokens are removed immediately from the table without highlighting them in red because they are not saved yet.
Containers Created With This Template
Optionally, a table of all containers created from the template can be displayed. Additionally, clicking the button Compare adds a new column to the table showing the differences for the token types between the containers and the template. The row missing lists the token types included in the template but not in the container. The row additional lists the token types included in the container but not in the template.
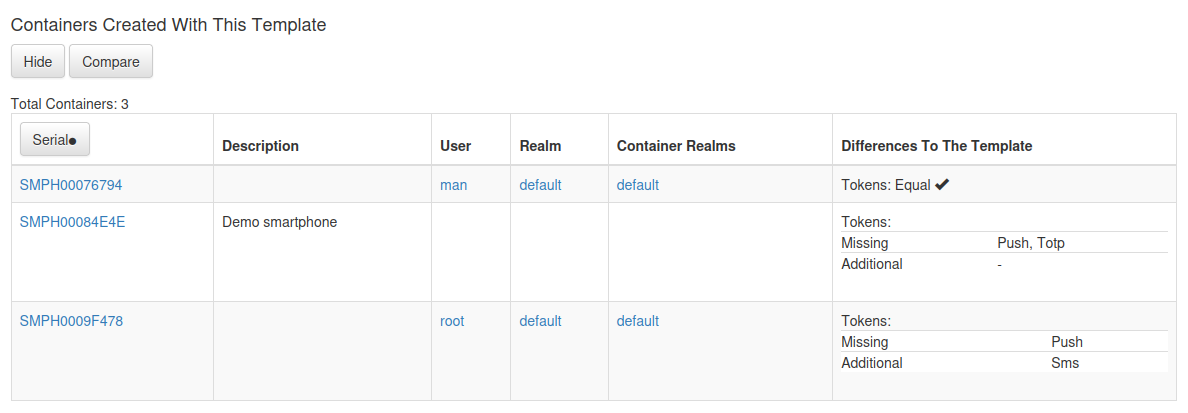
Comparison of the Template to the Containers Created with this Template
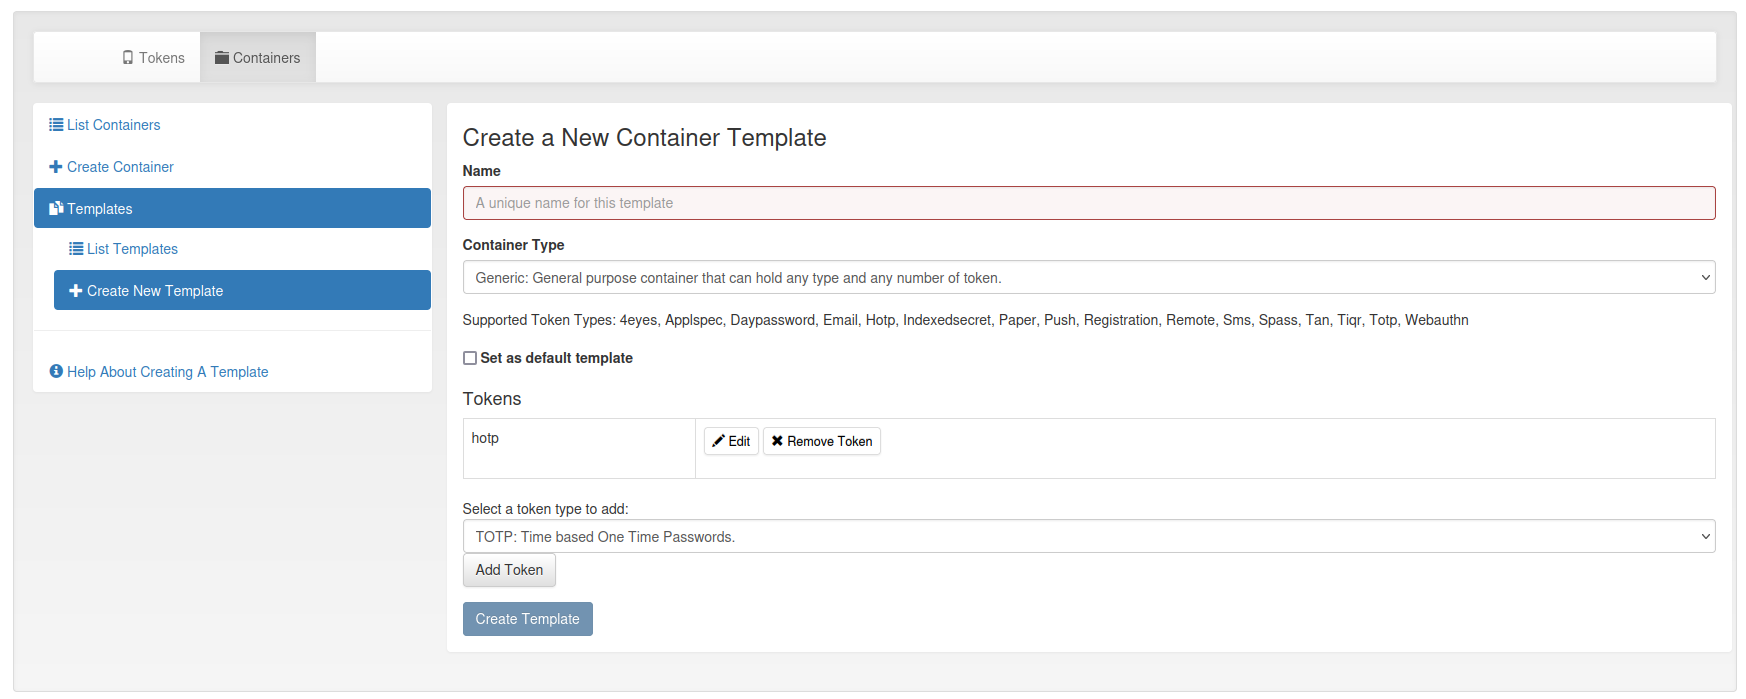
4.5.1.4.3. Template Create
To create a new template, a unique name must be specified. If an existing name is entered, a warning will appear and creation will be disabled. Additionally, the container type has to be selected. Below the drop-down menu, all token types supported for templates of the container type are displayed.
The template can be selected as the default for this container type. For each container type, one template can be the default. Setting the template as default removes the default setting of the previous default template.
Finally, the tokens have to be added to the template. Clicking on the Edit button behind the token opens a section where you can change the enroll options for the token. By default, the token will be assigned to the user of the container. This can be disabled at the bottom of the section.
Create a Container Template